
Wednesday, August 19, 2015
Tuesday, August 11, 2015
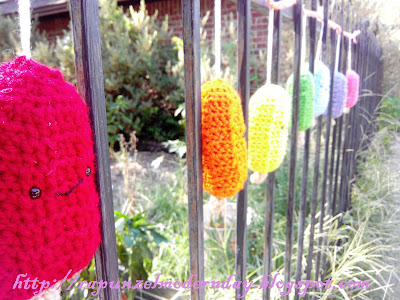
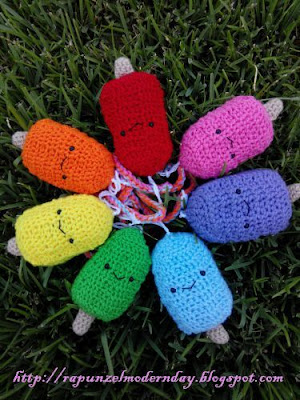
FREE Popsicle Crochet Garland
It is here! Your adorable, summertime crochet garland! Introducing....THE POPSICLE CROCHET GARLAND!!! :-D Ta da!

Popsicles are a classic Summer treat! So cool, colorful, and sweet! ;-) Why not crochet some adorable Popsicles to hang in your home to celebrate Summer?

This pattern is 11 pages long and has 28 pictures (plus finished product pictures) to help you create your one of a kind garland.
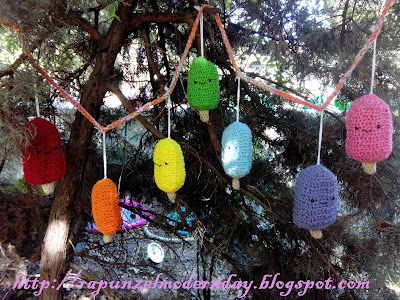
The pattern even shows you how to do a Back Post Single Crochet stitch and a Front Post Single Crochet stitch. :-)
The Back Post Singe Crochet and Front Post Single Crochet create a raised bump to make the Popsicle look like the kind that could rip apart to make 2 Popsicles. So cute!

To make the garland you will need:
3.75 mm hook
6.50 mm hook
Red Heart Super Saver yarn (I used 7 different colors)
7 mm safety eyes
Black embroidery floss
Yarn needle
Stuffing
Scissors
And, of course, the Popsicle Pattern!

Have fun creating your cute Popsicle garland!


Popsicles are a classic Summer treat! So cool, colorful, and sweet! ;-) Why not crochet some adorable Popsicles to hang in your home to celebrate Summer?


3.75 mm hook
6.50 mm hook
Red Heart Super Saver yarn (I used 7 different colors)
7 mm safety eyes
Black embroidery floss
Yarn needle
Stuffing
Scissors
And, of course, the Popsicle Pattern!

Have fun creating your cute Popsicle garland!


Wednesday, August 5, 2015
Back to School Garland is Here!
I know no one really wants to think of going back to school but this garland will make going back a little easier with these cute little faces cheering you on. :-)

The pattern for this garland includes a book, ruler, glue bottle, pencil, crayon box, notebook paper, and an apple. Each design has a cute little face that is just adorable! :-)

The pattern is 27 pages long and includes 78 pictures to help you make you own amazing Back to School Garland.

When designing this garland, I was trying to stick to classic, elementary school supplies. Back to the good ol' days... ;-)

One cool thing is, the book can be customized to be any school subject (or any book) you would want it to be. Change Math to Calculus. Science to Biology. Add in Harry Potter or Matilda. Let your imagination fly!

The Back to School Pattern is available in my Etsy Shop and Ravely Shop for $8.00.

Thanks for reading!

Tuesday, July 28, 2015
FREE American Girl Hooded Towel Pattern

What you will need:
~1/3 of a yard of Towel like fabric
~Matching thread
~15 inches of ribbon (I used 1 1/2 inch but any size would be cute)
~Scissors
~Sewing machine
~The pattern piece HERE (be sure that the scale is to "None")
*All seams are 1/4 inch*
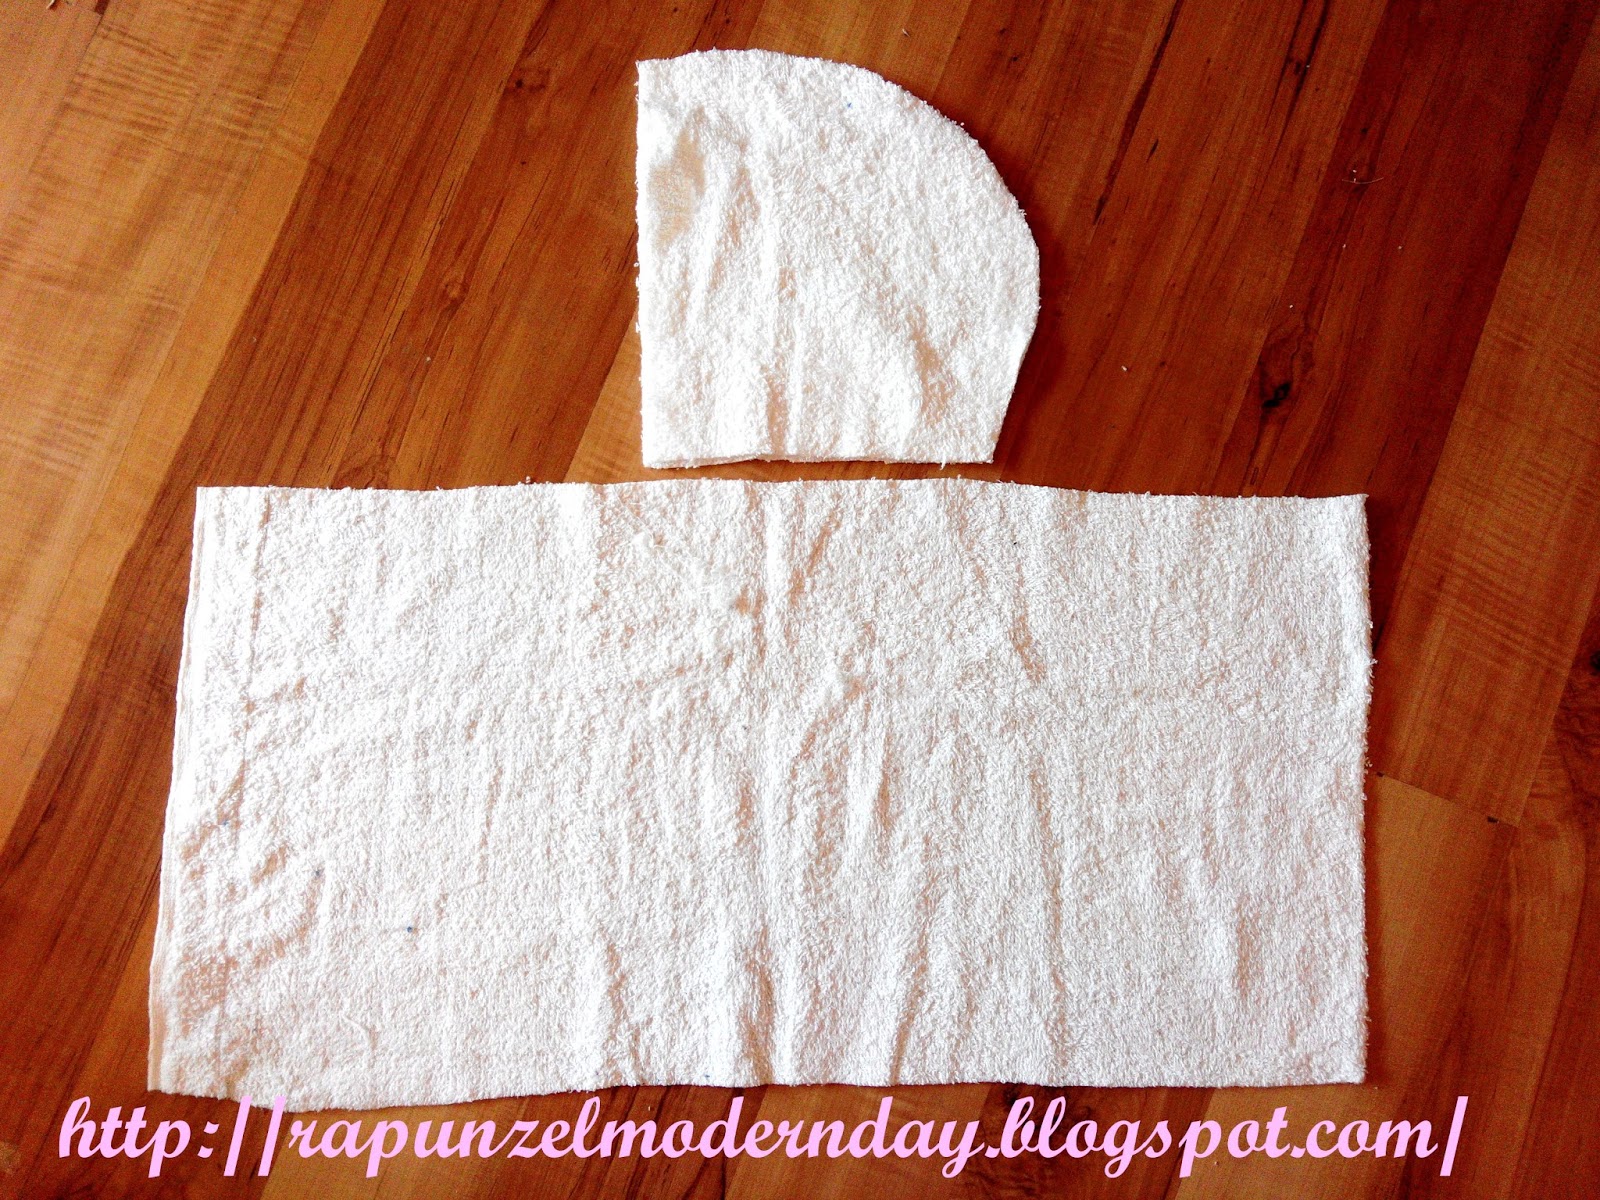
1. Cut 1 piece that is 12 inches by 22 inches. Cut 2 of the Hood pattern.

2. With right sides together, sew the 2 hood pieces together along the curved edge. Clip curves.


3. Hem the long edge of the hood. Addy was helping me out, she was in a sewing mood. ;-)


4. Sew the ribbon to the hood, a 1/2 inch away from the edge. Set aside for now.

5. Hem all 4 sides of the large towel piece. For the bottom hem, I did a larger (about 1 inch) hem.
You can do whatever you think looks good. :-)

6. With wrong sides together, fold your hemmed towel in half. Place a pin to mark the middle. Open the towel back up.

7. With right sides together, pin the hood to the towel, matching the center seam of the hood to the pin on the hemmed towel. Sew together.


I hope you (and your dolls) like the pattern! :-D
Here are some more pictures for your viewing pleasure! And I may or may not have gotten carried away with editing the pictures. Hehe! ;-)


 |
| I also made some out of blue towel fabric, and 3/4 inch ribbon. So cute! |


Wednesday, July 8, 2015
FREE Pattern Disney Prince Tank Top and Shorts
I have a FREE pattern/tutorial for you today. Whoo hoo! :-D

This is a pattern is how to make a tank top and shorts to fit the Disney Prince and older Ken dolls. All my princesses had Barbie clothes to wear and fit well, while the Ken clothes, well, fit the Princes like second skin. The shoes fit, just not the clothes. So I went and made my own clothes for the guys to wear during the summer. Especially for Kristoff. Furs and summer heat don't mix.
On to the tutorial!

You will need:
thin jean material (or any cotton)
an knit t-shirt (I used the sleeves of an old t-shirt I was turning into a tank top for my brother)
1/2 in elastic
Safety Pin
tread
scissors
sewing machine
Optional- Fabric markers

1. First we will start with the tank top. Cut 2 of the tank top. I lined up the bottom edge of the pattern with the hem of the fabric so I wouldn't have to hem it.

2. With right sides together, sew the shoulder seams and side seams together.

3. Pink edges.

4. Flip right side out. You can leave the shirt like this or you can use fabric markers to draw a design on the shirt. Just follow the direction on your box of markers and make sure the design is dry before putting the shirt on your doll.


For the shorts

1. Cut 2 of the Shorts pattern piece.

2. With right sides together, sew 1 "J" piece together. Pink edge. Open up.

3. Hem the top.

4. Fold the hemmed edge down enough so your elastic can fit through (a little more than a 1/2 inch). Stitch across. You just made the elastic casting! :-)


5. Cut a 6 inch piece of elastic. Thread the elastic through the elastic casting using a safety pin.
*Tip* Sew down the edge of the elastic so it won't go flying out.

6. With right sides together, sew the other "J" piece together. Pink edge.

7. Hem the bottom of the shorts.

8. With right sides together sew the crotch area.

9. Flip right side out. Ta da! Your doll now has some fancy duds! ;-)

I hope you liked the tutorial and pattern! :-)
Subscribe to:
Posts (Atom)